
I acquired my copy of Photoshop Element 7 some years ago from Ebay, but with the many online websites that offer the same services or some very good free version (gimp) I am yet to upgrade.
When using Photoshop Elements I always use the ‘Save for Web’ option .
This option allows you to tweak the setting to maintain the image quality, but with a smaller file size so is quicker to download, especially as mobile website viewing is ever increasing.
Saving as a jpeg and setting the quality is my default settings and can easily reduce an mage from 623K to 22.9k

When building a website< I make sure all images have gone through this process so the page speed is as quick as I can make it.
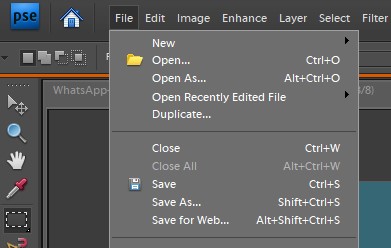
The process is:
- Open an image and choose File > Save For Web.
- Choose JPEG from the optimization format menu.
- To optimize to a specific file size, click the arrow to the right of the Pre-set menu, and then click Optimize To File Size. Enter a number in the Desired File Size text box, and select either Current Settings, which optimizes for the current settings, or Auto Select GIF/JPEG, which automatically determines whether JPEG or GIF is the better format.
- Do one of the following to specify the compression level:
- Choose a quality option (Low, Medium, High, and so on) from the pop‑up menu under the optimization format menu.
- Click the arrow in the Quality menu and drag the Quality pop‑up slider.
- Enter a value between 0 and 100 in the Quality box.The higher the Quality setting, the more detail is preserved in the optimized image, but the larger the file size. View the optimized image at several quality settings to determine the best balance between quality and file size.
5. Select Progressive to display the image progressively in a web browser; that is, to display it first at a low resolution, and then at progressively higher resolutions as downloading proceeds.
6. To preserve the ICC profile of the original image in the optimized file, select ICC Profile. Some browsers use ICC profiles for colour correction. The ICC profile of the image depends on your current colour setting.
7. If the original image contains transparency, select a Matte colour that matches the background of your web page. Transparent areas in your original image are filled with the Matte colour.
8. To save your optimized image, click OK. In the Save Optimized As dialog box, type a filename, and click Save.
Once you have the settings tweaked this can be a quick process and there are even tools that can automate this, but I like to check each image as some need to be higher quality.
If you would like me to check your site click on the button below and we can see if your site is suitable for our speed optimisation process.
